SERVERLESS DEPLOYMENT OF WEB APPLICATION (PART 2) !!
Creating an API to Trigger AWS Lambda & Hosting a Static Web App Using S3
To build a serverless architecture, you can use AWS Lambda for backend processing and Amazon S3 to host a static web app.
-
Triggering Lambda via API Gateway:
-
Create an AWS Lambda function with your required logic.
Set up an API Gateway to expose an HTTP endpoint.
-
Integrate the API Gateway with the Lambda function to handle requests.
-
Deploy the API and test it using a client or Postman.
-
Hosting a Static Web App Using S3:
-
Upload your HTML, CSS, and JavaScript files to an S3 bucket.
-
Enable static website hosting in the S3 bucket settings.
-
Set the correct bucket policy and CORS configuration for public access (if needed).
-
Use CloudFront for improved performance and security.
This setup allows you to build scalable web applications with minimal infrastructure management.
Do search for the amazon "API Gateway" in the search box and select the application
Choose the "REST API" and click on the "build" button
Create a "New API" and give a "API name" of your choice
Select the "API end point" and click on "Create API"
Now we need to create new methods by clicking on "Create method" button as shown in the given figure below
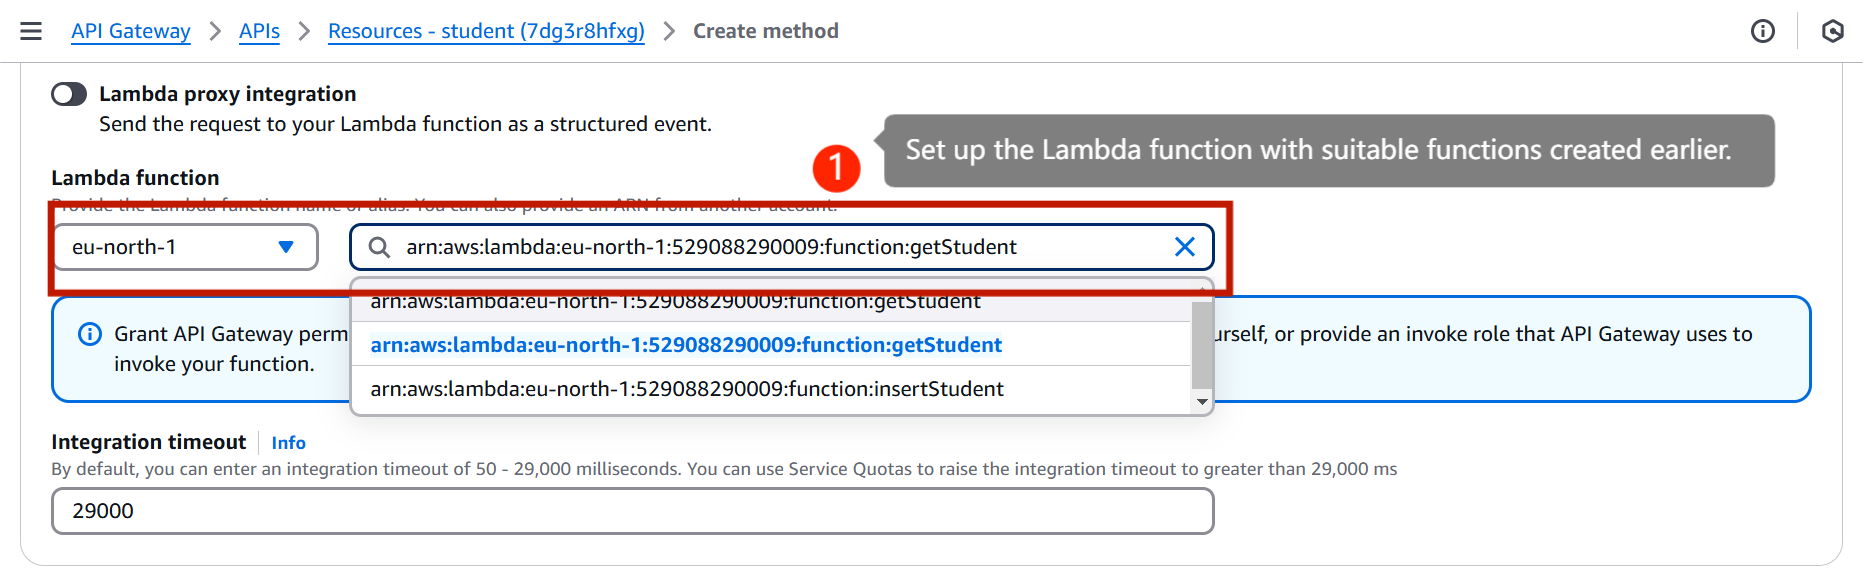
Select a "Method type" , here we are selecting the "GET" method and also choose the integration type "Lambda function" , it basically integrates your API with a Lambda function
Set up the Lambda functions with suitable functions created earlier , it grants the API Gateway permissions and provides an invoke role that API Gateway uses to invoke your function.
After following all the above sequential steps , finally click on "Create method " button.
Here appears the "Method request settings" options and we can edit the Authorization, API key etc., here
The functions/methods can be tested here
"GET" method test results will be appeared here
In the previous steps we have seen how to create "GET" method similarly create a new method for "POST" , as shown in the below figures. Follow the same steps as followed earlier.
Select a suitable "Lambda function" for "POST" method
Click on "Create method" for creating a new "POST" method
Successfully the "POST" method has been created
Create or select a stage where your API will be deployed
The stage details appears here and copy the URL displayed here
Click on "Deploy API", successful deployment takes place. Now click on "Enable CORS"
Make suitable changes in the "CORS" and click the "Save" button.
Search for the amazon "S3" in the search box and select the application
Click on "Create bucket" to create new buckets
Click on server-side encryption with Amazon S3 managed keys and enable the bucket key and then click the "create bucket" button
Select a suitable bucket type and bucket name
After clicking on "create bucket" , a message appears telling that bucket has been created successfully
Click on "Upload" button so that your files can be uploaded here.
Later click on "Add files" button to add the files here.
You can see that the added files appear here
Finally click on the "Upload" button. To upload all the files
Now copy the "Amazon Resource Name" , it will be used while creating our own policies.
 Click on "Static website hosting" and later click on "edit" options
Click on "Enable" static website hosting and select a suitable hosting type, here we are choosing to host a static website .
Specify the default page of the website
Now go to the permissions tab and perform operations on bucket policy
Edit the bucket policy by clicking on "Learn more"
Edit the block public access by entering "confirm" in the field and clicking on "Confirm" button.
Click on edit bucket policy button
Click on "policy generator" button to customize your own bucket policies.
First select the policy type and then paste the "Amazon resource name" copied earlier
Click on "Generate Policy" button to generate the customized policies.
Copy the text appeared in "Policy JSON Document" to a text editor.
The deployed application can be seen here


Comments
Post a Comment