Serverless Deployment of web application (PART 1)

 SERVERLESS DEPLOYMENT OF WEB APPLICATION !!

What is Serverless?

Serverless computing allows developers to build applications without managing infrastructure. While servers exist, they are managed by cloud providers like AWS. This lets developers focus more on writing code rather than handling infrastructure.


Need for Serverless

Better Scalability: Automatically handles traffic spikes.
Auto Provisioning: No need to manually allocate resources.
Cost Optimization: Pay only for the resources used, not for idle servers.

Traditional vs. Serverless Deployment

In a traditional setup using EC2, we manage CPU, RAM, and storage. Even if the application receives low traffic, we must pay for the full server capacity. With serverless, resources are allocated dynamically based on demand, reducing costs.

This guide is divided into two parts:

Part 1: Setting up a DynamoDB table and AWS Lambda function.
Part 2: Creating an API to trigger the Lambda function and hosting a static web application using S3.
Now, let’s begin with Part 1, where we will create a DynamoDB table and configure Lambda.

Pre-requisites
1.AWS account
2.IAM role to allow Lambda to access DynamoDB

Part 1: Setting up a DynamoDB table and AWS Lambda function.


Open the AWS management console and search for the dynamoDB in the search box.


Click  on the dynamoDB as shown 


Select the "Tables" and then click on  "Create Table"


Write a suitable "Table name" in the provided space and also select and write the "Partition key" (Primary key)


Click on "Create table" icon at the bottom right of the page,  then the table will be created

Now in the AWS console search for "AWS Lambda" in the search box and click on "Create a function" button


Select one of the options among  whether to create a function from scratch (or) use a blueprint (or) a container image to deploy the function . Enter a name that describes the purpose of the function


Select a proper "Execution Role". If "Existing role" is selected for the "Execution role" then, choose an existing role that you've created. If existing role not created then click on IAM console to create your required role . Then click on "Create function" icon to create a new function of your choice.


"getStudent" function has been created

The code part of the "getStudent" can be written in the provided space. Then click on the "Deploy" button. After clicking the deploy button a message called "Successfully updated the function getStudent " will be displayed.


Later click on "Test" button. Then "Create a new test event".


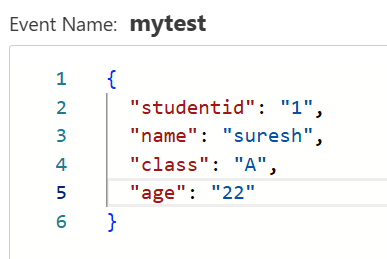
Give a name for "Event Name". Then select suitable "Event sharing settings".


The test cases and the arguments can be passed in the "Event JSON" field as shown

The output will be obtained in the following format


We have seen how "getStudent" function have been created , similarly create a a function with the name "insertStudent".


The code part of "insertStudent" function can be written in the code part . Then after deploying successfully then test the code.


Pass the following test case with suitable arguments as shown


This is the output obtained for the "insertStudent" function


Now we can see that the arguments passed in the "insertStudent" has been reflected in the dynamoDB database table that we have created [dynamoDB]

The 2 functions that are created in be seen here [AWS Lambda]


Till now we have just seen creating of dynamoDB table and lambda functions. In the next blog we will be discussing about "CREATING API TO TRIGGER LAMBDA FUNCTION AND S3 STATIC WEB HOSTING"


Comments

Popular posts from this blog

Hugging Face: Empowering AI with Open-Source Innovation

Serverless deployment of web application (part 2) !!!